Thursday, April 15, 2010

More Pinkalicious

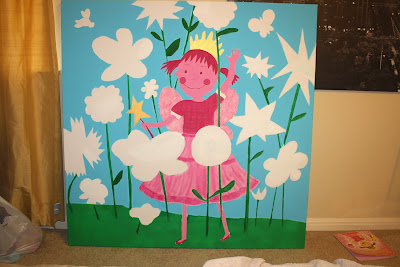
Here's an updated photo of the Pinkalicious painting. I have finally filled Pinkalicious in herself. I also did a special texture on both her wings and parts of her skirt...in the book she kind of has lacy wings and lacy tiers on her skirt so I decided to cut up some doilies to get the same kind of effect.

You can't really see it in the photo (at least on the wings) but it turned out really cool and definitely looks more like the book than plain paint would have. Will have to see if I can get some good close ups when it is done.

I still have quite a ways to go since I have to cut all the flowers out of fabric and mod podge them on. Still have major touch up work around Pinkalicious and in the grass & stems but some of that will be the last thing I do.

Best part of this process, is that I work on it an hour here and there and each time I do something, Ava comes in and notices and tells me how much she loves the new part. I actually caught her hugging and kissing the painting the other morning as I was getting ready. So glad she likes it!

Saturday, April 10, 2010

Pinkalicious in Progress

Here is what I am currently working on...finishing up Ava's big girl bedroom. It has been too long of a project (maybe because I have procrastinated and also because of all the stuff we have had going on ranging from parties to being sick).

Anyways, you may recall, I was refinishing (with the help of my father-in-law & hubby) some vintage bedroom furniture for her new room. My AMAZING father-in-law, Rudy surprised us by finishing the project himself! I was a bit relieved b/c I did not know when we were going to be able to finish it and it looks AWESOME! I promise to post photos soon, I just need to finish repainting the hardware first so you can get the complete look.

At any rate, getting back to this post. Ava loves the book Pinkalicious (if you have a girl in preschool you know what I am talking about). So I decided to paint a picture from the book for a big empty wall in her room.

Here is the scene from the book:

And here is the painting in progress. This thing measures 4' x 4'. I made some adjustments to the picture...I decided the sky should be a Tiffany/Robin's egg blue. I want this to be bright and colorful. Next step is to paint Pinkalicious herself and then the final step is to make all the flowers out of fabric and mod podge them on. Think it will look really cool and will be a good way to use fabric scraps I have lying around. Plus I have so many cute, pink or girly fabrics I can't wait to incorporate in this painting.
I'll post more pictures as I get further along.
Sunday, March 28, 2010

First Birthday Outfit

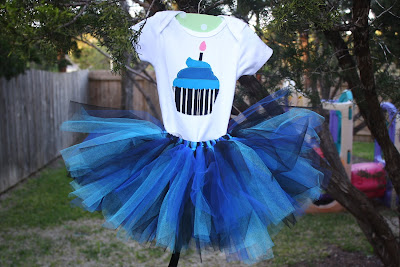
My sister in NYC wanted a birthday outfit for her adorable daughter Griffin who turns one on April 28th. She knew she wanted a tutu and onesie outfit and wanted it to be blue but other than that did not really have an exact thing she wanted.

So I whipped up this cute cupcake number with a tie-on tutu. I usually do the no-sew tutus that you have to pull on. This time though, I decided to tackle the tieon kind as it probably is easier to get on babies who don't walk/stand yet. It's pretty much like the no-sew tutu except that I sewed ribbon to both ends of the elastic and then after tying on the tulle strips, I sewed them to the elastic so they won't move around.

End result: Super cute, black & blue cupcake tutu outfit! Now I am just wishing I had a time machine so that Ava could have this when she was one. Oh well!


PS. I apologize for the lack of posts recently but it has a been a busy month of surprise parties, furniture refinishing (post on that later), toddler birthday parties and the great sickness of 2010. Needless to say, I've been exhausted!

Friday, February 26, 2010

Twirly Dress

Ava has a thing for her "twirly" dress. I bought a pink dress on sale last year at Target and these days it is all she ever wants to put on. That or her brown and pink polka-dotted twirly dress. So 2 weeks ago, I took a look at it and thought, "I can make that." Essentially it is 3 gathered stripes of fabrics sewn to the bottom of a shirt.

So I found a toddler Hanes undershirt I had laying around as well as 3 coordinating scraps of fabric (that were long enough -- this was key). I took a look at the undershirt and it was not very girly so I added a casing in the armholes and elastic to scrunch them up and I turned down the collar and sewed it so it was a little more girly.

It turned out really cute and I am pretty proud of myself since I made this without a pattern! Can't wait to try this again with a more fitted tshirt for the top part but all in all, it is cute and more importantly, Ava has a new twirly dress that she loves!

Happy!Twirl!
Jump!

Thursday, February 25, 2010

Tutus

I have a bit of an obsession lately...tutus. Partly because I think they are so cute & girly and partly because Ava & her friends are a bit obsessed with tutus lately too. I guess when you are 3 and go to dance once a week, you decide that dance class should really be a fashion show for all your crazy tutus, hair accessories, costumes etc. But luckily for me (& Ava's friends), I figured out how easy it is to make these no-sew tutus.

Last week, I whipped up a little purple & black number in less than 30 minutes...

so this week I decided to make not only Ava a new tutu, but also her friends Sydnee (in green) & Sienna (purple).

Needless to say, they were all pretty excited with their tutus and matching hair accessories. And I spent less than an hour making these girls really, really happy. Mission accomplished. Now I can't decide how many tutus for Ava is too much (is there such a thing?).

Sunday, February 21, 2010

Redoing Vintage Bedroom Furniture - In Progress

Weekend 1 complete on this furniture project. Yeah!! We were able to strip the furniture, sand it and prime it. We accomplished a lot more than I thought we would in those few days and I am thankful to my in-laws & hubby for their help (both with the furniture & babysitting our daughter) so that we can work on this.

We will still have to go down to Conroe to work another weekend (at least) to finish the project but I am already pleased with the results thus far.

Furniture after stripping the varnish off:
Rudy, hard at work with the paint gun:

Me, working...and not looking my best!
After being primed:

Redoing Vintage Bedroom Furniture - Before

Here is the second furniture refinishing project I am working on. Once again, I enlisted help from my father-in-law, Rudy, to help with this project. My mother-in-law, Jeanie, has had this bedroom set since she was a girl and we are redoing it for Ava's big girl room.

Eventually it will be white, but here are the before photos. We had to strip off the varnish, sand them, prime them and then we will paint them.

Chest of drawers:

Headboard & Footboard:
Stool:


Vanity:

Top of vanity (that holds mirror):

I love the way this vintage furniture looks...fairly simple yet will be perfect for a little girl's room. Still trying to decide if I am going to use the vintage hardware or not. Leaning towards yes because I love the little doorknocker style and the floral design on the knobs. Just wondering if I should paint them hot pink to be a little girly/funky or if I should just do them a bronze or black or something more neutral.
Related Posts Plugin for WordPress, Blogger...